
TL;DR
A closet can become a surprisingly good studio with proper placement and treatment. Distance, absorption, and sealing gaps matter more than just adding foam. Managing heat and sound leaks makes all the difference.
Ever thought a closet could be your secret weapon for recording vocals or podcasts? Turns out, with the right tweaks, it can be a soundproofed, acoustically-treated haven. Most people focus on foam panels or fancy gear, but the real magic lies in placement and sealing gaps. This article is your guide to mastering the ‘rig in the closet’ — how to dampen, position, and breathe life into a tiny space for professional results.
Whether you’re a creator working on tight budgets or a pro looking for quick wins, understanding the difference between dampening and soundproofing, plus where to place your treatment, will transform your space. Let’s dive into what works, what doesn’t, and how to get the most out of your closet setup.
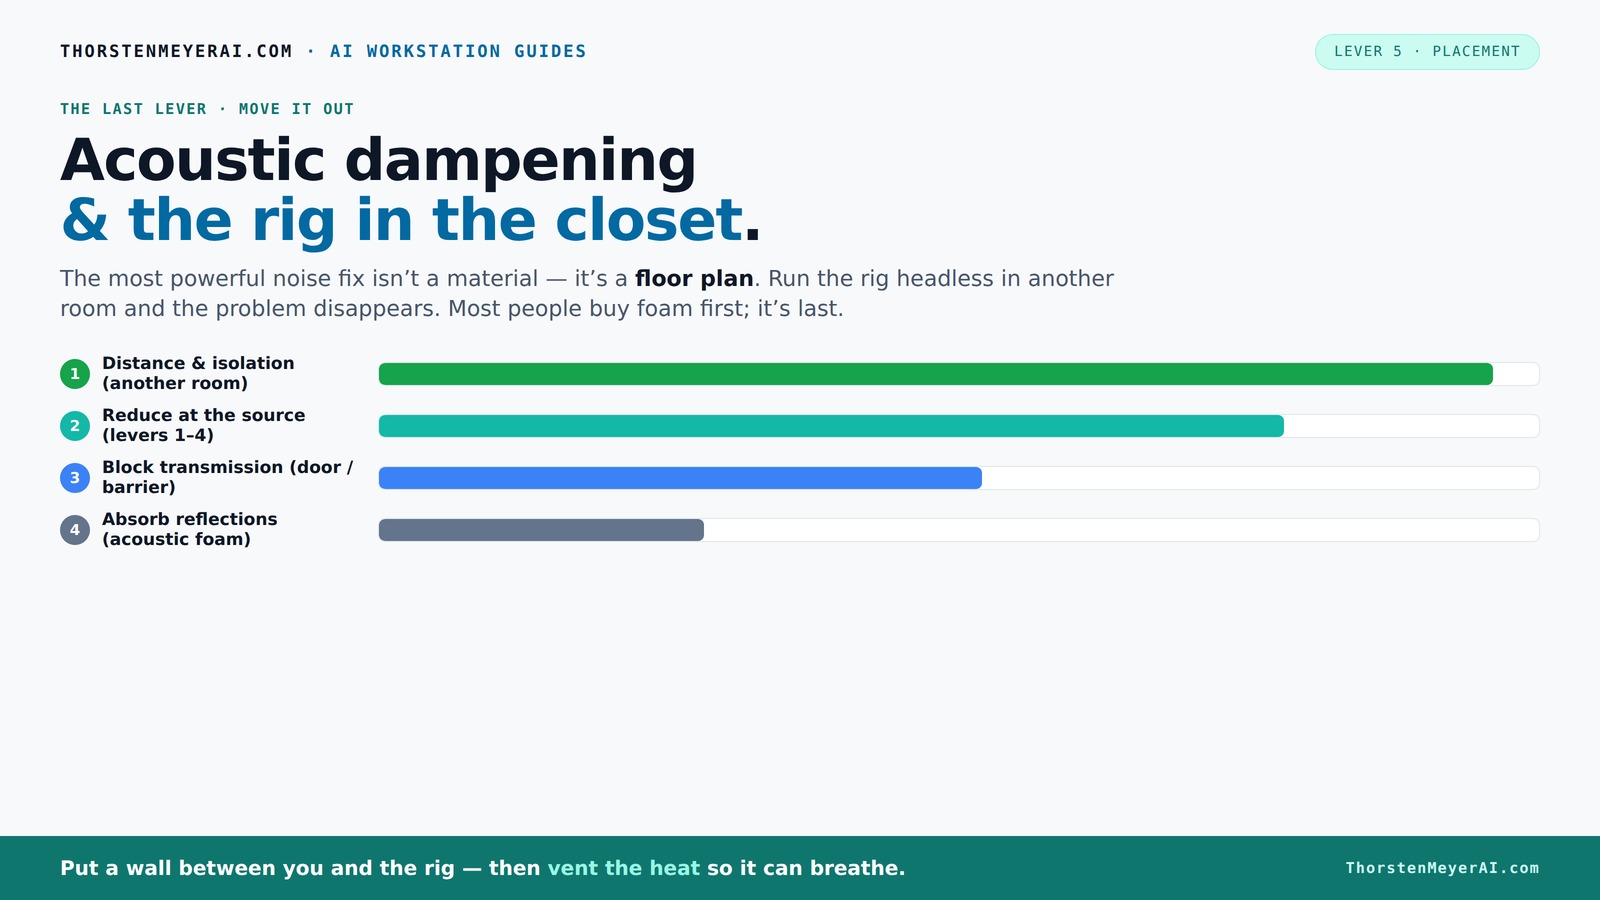
Acoustic dampening
& the rig in the closet.
The most powerful noise fix isn’t a material — it’s a floor plan. A rig you can’t hear because it’s in another room beats any amount of foam. Tap the approaches in Part 1 to see what actually works.
(another room)
(levers 1–4)
(door / barrier)
(acoustic foam)
Contain the noise, not the heat
Key Takeaways
- Distance and sealing gaps are the most effective ways to reduce noise from a closet rig, often more than foam treatments.
- Placement of acoustic panels at reflection points and in corners dramatically improves sound clarity, especially for vocals.
- Managing heat through ventilation is crucial when placing a computer in a sealed closet to prevent overheating and throttling.
- DIY solutions like blankets and rugs can be surprisingly effective but combining them with targeted acoustic panels yields best results.
- Proper mic placement and workflow habits can turn a simple closet into a professional-sounding recording space.

Focusound 52 Pack Acoustic Foam Panels 1" x 12" x 12" Sound Proof Foam Panles Soundproofing Noise Cancelling Wedge Panels for Home Office Recoding Studio with 300PCS Double-Side Adhesive
Soundproofing - Acoustic foam panels triangular grooves structure for better noise absorption, helps to reduce and absorb unwanted...
As an affiliate, we earn on qualifying purchases.
As an affiliate, we earn on qualifying purchases.
What a Closet Rig Can and Cannot Do
Think of your closet as a mini studio — it can greatly improve your sound, but it’s not magic. A small, enclosed space is great for reducing echo and focusing vocals. But don’t expect it to block all sound leaks or eliminate low-frequency rumble without extra work.
For example, a closet with thick blankets and foam can cut down echo by 70%, making vocals clearer. Yet, if the door leaks sound, your neighbors will still hear you. The key is understanding what your closet can handle — and what it can’t.
Most creators report that a well-treated closet boosts recording quality, especially for voice-over, singing, or podcasts. But it’s a compromise; a tiny space can cause bass buildup, and hard surfaces reflect sound, creating muddiness if untreated.
Understanding these limitations helps you prioritize what to treat and how to manage expectations. For instance, if low-frequency rumble is a problem, targeted bass trapping is essential, but if echo is the main issue, absorption at reflection points is more effective. Recognizing the trade-offs—such as sacrificing some natural room ambiance for clarity—is key to designing a balanced setup that suits your needs.

BXI Sound Absorber, 12 X 12 X 0.4 Inches 16Pcs High Density Acoustic Absorption Panel, Sound Absorbing Panels Reduce Echo Reverb, Tackable Acoustic Panels for Wall and Ceiling Acoustic Treatment
【SPECIFICATION】: High Density - 200kg/m3; Dimensions - 12 X 12 X 0.4 inches(cutting tolerance: 2%), pack of 16,...
As an affiliate, we earn on qualifying purchases.
As an affiliate, we earn on qualifying purchases.
Dampening vs. Soundproofing: What's the Real Difference?
Acoustic dampening and soundproofing are often confused, but they serve different goals. Dampening, like foam panels, absorbs mid and high frequencies, reducing echo and reflections inside the space. This absorption prevents sound from bouncing around excessively, which can muddy recordings and reduce clarity. Think of it as controlling the internal acoustics to make your voice sound cleaner.
Soundproofing, on the other hand, blocks sound from leaking out or coming in. It involves adding mass, sealing gaps, and creating physical barriers to prevent noise transmission. For example, sealing gaps around the door with weatherstripping prevents sound from escaping into neighboring rooms, while adding mass to the walls—like extra drywall—reduces sound transfer.
Choosing between the two depends on your goals. If your primary concern is echo and reflection within the closet, dampening is sufficient. If you want to prevent your voice from disturbing others or to block external noise, soundproofing is necessary. Often, combining both yields the best results, but it's important to understand that each has trade-offs: dampening improves internal clarity but doesn't stop sound leaks, while soundproofing can be more costly and labor-intensive but offers privacy and noise control.
For instance, if your main issue is muffled recordings due to reflections, focus on internal dampening. If your neighbors complain about noise, invest in sealing gaps and adding mass. Recognizing these distinctions helps you allocate your resources effectively and avoid unnecessary expenses.

Portable Recording Booth for Home Studio, Foldable Sound Isolation Vocal Shield with Floor Stand, High-Density Acoustic Blanket Enclosure for Singing, Voiceover & Podcast, Includes Phone Holder
INSTANT STUDIO-QUALITY "DRY" SOUND: Transform any noisy room into a professional vocal booth instantly. Engineered with high-density acoustic...
As an affiliate, we earn on qualifying purchases.
As an affiliate, we earn on qualifying purchases.
Where to Place Acoustic Treatment for Best Results
- Reflection points: Position foam panels at mirror points where sound bounces back — behind the mic, side walls, and ceiling. This targeted placement ensures you're absorbing the most problematic reflections, which are the primary cause of muddiness and echo.
- Corners: Bass traps go here to prevent low-frequency buildup and standing waves, common in small spaces. Properly placed bass traps can significantly tighten your sound, making vocals and instruments clearer and more balanced. Neglecting these areas often results in boomy bass and muddy recordings.
- Door and window seals: Use weatherstripping or acoustic seals to block sound leaks. This prevents external noise from contaminating your recordings and keeps your sound contained within the space, which is especially important if you're recording at odd hours or in noisy environments.
- Flooring: Rugs or carpets absorb reflections from hard floors, reducing muddiness and improving clarity. A thick rug can also prevent sound from bouncing underneath your setup, especially if you’re using a mic close to the floor.
- Overhead treatment: Since ceilings reflect a lot, foam or hanging blankets can cut early reflections. This is crucial because ceiling reflections often go unnoticed but can significantly impact your recording's clarity.
For example, placing a bass trap in the corner behind your mic can reduce bass boom by up to 50%, resulting in cleaner vocals. Using a reflection filter behind the mic can also help control room sound. The key is to treat the most reflective surfaces first, then add additional panels as needed, always focusing on the areas where sound naturally bounces back.
Remember, placement is more important than sheer quantity. Properly positioned treatment yields better results than simply piling on foam panels. Prioritize reflection points and corners to get the most bang for your buck.

Weather Stripping Door Seal Strip - Soundproof Q-Shaped Foam for Exterior Door Frame, Large Gap Seal, Noise Cancelling, Easy to Install (Black, 26FT)
No light penetration: Our door seals are made of high-density foam core material, which effectively blocks light from...
As an affiliate, we earn on qualifying purchases.
As an affiliate, we earn on qualifying purchases.
Sealing Gaps and Managing Hard Surfaces
Sound leaks through cracks, gaps, and hard surfaces. Sealing these is often the cheapest and most effective step because it directly blocks unwanted noise and prevents sound from escaping or entering. Using weatherstripping around the door and sealing gaps with acoustic sealant can cut out 80% of sound escape, making your space much more contained.
Hard surfaces like walls, floors, and ceilings reflect sound waves, creating echoes and muddiness. Covering them with soft materials like blankets, rugs, or hanging acoustic panels can dramatically reduce these reflections. These surfaces act as mirrors for sound, so softening them prevents sound from bouncing back into your microphone and causing muddiness or echo.
For instance, hanging a thick blanket over the closet door or placing a large rug on the floor can absorb reflections and reduce echo, resulting in clearer recordings. Consider also adding acoustic panels or foam tiles to the walls for a more controlled environment. The goal is to minimize both sound entering and leaving your space, which improves privacy and internal clarity.
Advanced options include foam-lined panels or adjustable acoustic curtains, which can be moved or removed depending on your needs. Always evaluate your specific space to identify the most critical leaks and reflection points. Sealing gaps and softening surfaces are cost-effective ways to dramatically improve sound quality and are often more impactful than expensive equipment upgrades.
According to [4], sealing gaps and softening reflective surfaces can improve clarity by up to 60% in small spaces, making them essential steps in your treatment plan.
DIY Materials vs. Commercial Acoustic Products
Budget restrictions? No problem. You can DIY your way to a decent closet booth. Thick blankets, moving blankets, and DIY panels made from egg crates or foam mats can absorb sound effectively, especially when placed at reflection points and corners. These materials are cost-effective and readily available, making them perfect for quick fixes.
For example, attaching moving blankets to walls with clamps or using recycled foam from packaging can significantly reduce echo. Rugs, mattress toppers, and even DIY panels from egg cartons can help control reflections without breaking the bank. However, these solutions often lack the precision and durability of commercial products, and their effectiveness can vary based on placement and material quality.
On the other hand, if you want professional-grade silence, commercial products like engineered acoustic panels, bass traps, and soundproof doors are designed specifically to target certain frequencies and prevent sound leaks. They often come with mounting hardware and detailed specifications, making installation more straightforward and predictable in results.
Many creators find that a hybrid approach—combining DIY solutions with a few quality commercial panels—provides the best cost-to-performance ratio. This allows flexibility and scalability as your needs evolve. Always consider your specific environment, budget, and goals when choosing materials. Proper placement and understanding of your space's acoustic characteristics are crucial regardless of the materials used.
Mic Placement and Workflow Tips in Your Closet Studio
The way you position your mic matters just as much as treatment. Place the mic slightly off-center from reflection points, pointing into the space, not towards the door or wall. This minimizes the pickup of unwanted reflections and room noise, helping your voice sound clearer and more focused.
For vocals, a pop filter and a mic stand placed at mouth height help reduce plosives and unwanted noise. Keep the mic a few inches away from reflective surfaces like walls or the ceiling to prevent sound from bouncing directly into it, which can cause muddiness.
Use a directional mic if possible — cardioid or hypercardioid — to focus on your voice and reject room noise. A good example: a Rode NT1-A or Shure SM7B works well in small acoustic spaces because of their pickup patterns and noise rejection capabilities.
Workflow tip: record with your closet door closed, but open it slightly if you notice muffling or excessive room sound. Use headphones to monitor and adjust your positioning for clarity. Small adjustments in mic angle and distance can make a significant difference in the final sound quality.
Remember, a well-placed mic can turn a noisy closet into a professional-sounding recording space, especially when combined with proper treatment and positioning.
Common Mistakes to Avoid in Your Closet Setup
Many DIYers focus solely on foam panels and forget about sealing gaps or managing reflections. This oversight leads to muddy recordings and sound leaks that compromise clarity. Proper sealing and placement are essential for an effective setup.
Another common mistake is placing the mic directly in front of a hard surface or in the corner, which causes bass buildup and echo. This positioning amplifies low frequencies and muddles the sound, making it harder to achieve clarity.
Overtreating the space with thick foam everywhere can deaden the sound unnaturally, resulting in a muffled or hollow tone. Balance is key; treat reflection points but avoid over-absorbing the space, which can strip away natural room qualities that add warmth and depth.
Finally, neglecting ventilation in a sealed closet causes heat buildup, which can damage your gear and reduce comfort. Always include airflow solutions, such as small vents or fans, when sealing your space to prevent overheating.
For example, sealing the door without addressing ceiling or floor reflections can trap sound inside and create a dull, echoing environment. Proper placement of treatment materials and ensuring adequate ventilation are vital to avoid these pitfalls.
Your Closet Can Be a Quiet, Clear Voice Hub — If You Do It Right
Transforming a closet into a recording space isn’t just about stuffing panels on the wall. It’s about strategic placement, sealing leaks, and managing reflections and heat. When you combine these steps, you turn a tiny, echo-prone closet into a surprisingly effective studio.
Remember, the goal isn’t perfect silence but clear, controlled sound. A well-treated closet can boost your recording quality by 50-70%, making your voice or music sound professional without the cost of a dedicated studio.
So, take the time to plan your placement, seal gaps, and manage heat — your voice, and your neighbors, will thank you. Recognizing the importance of each element and understanding their interplay ensures you don’t just throw materials together but craft a balanced, functional space that truly improves your sound.
Frequently Asked Questions
What is the main difference between acoustic dampening and soundproofing?
Acoustic dampening reduces echo and reflections within a space, making recordings clearer. Soundproofing blocks sound from leaking in or out, preventing noise from disturbing neighbors or being disturbed. Both are important but serve different goals.Where should I place acoustic foam panels in my closet?
Position foam panels at reflection points — behind the mic, side walls, and ceiling. Corners benefit from bass traps to control low frequencies. This targeted placement maximizes absorption and clarity.Do I need bass traps in a small closet?
Yes, especially if you notice low-frequency rumbles or booming sounds. Bass traps in the corners help prevent standing waves and bass buildup, resulting in clearer recordings.How much treatment do I really need for a closet booth?
Start with reflection points, corners, and sealing gaps. Add more panels if echoes persist or low-end muddiness remains. Over-treating can deaden sound, so focus on key problem areas first.Can I use blankets instead of foam panels?
Yes, blankets are a cost-effective way to absorb sound, especially when hung strategically. Combining blankets with foam panels offers a flexible, budget-friendly solution that still improves sound quality.Conclusion
Your closet isn’t just for storage — with strategic placement, sealing, and treatment, it can be your secret weapon for clear, quiet recordings. Think of it as sculpting a tiny, controlled environment where your voice shines, and noise stays outside.
Remember, the real magic happens when you manage heat, seal gaps, and treat reflection points. Your closet can become a surprisingly effective studio, saving you money and space, as long as you respect its limits and optimize wisely.